Tag Archives: gear maker tips

Base Layer Zip and Collar Finish

(new reformatted page coming soon, apologies for formatting)

Hello all, I know it’s been ages since I posted anything new. Here is a tutorial from the archives. If you are looking for a smooth, foolproof way to insert a zipper into knits or baselayers, look no further.
step24

I will show you how to do an enclosed inside finish,

Even and matching seams,
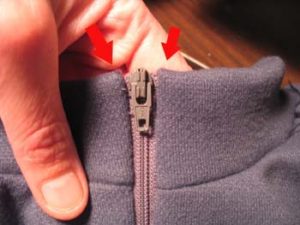
step13

And a very tidy zipper insertion:

step12

First, thanks to Jalie Patterns for the the zipper insertion technique.  Grey garment pictured is the Vuokatti baselayer pattern, offered free by Shelby Kaava Outfitters.

Let’s get started!!

Zipper Insertion

Part 1, preparation

(CF=Center Front, WS=Wrong Side, RS=Right Side)

Adjust, layout and cut your pattern as usual. Figure out how long you want the front zipper to be, and mark the CF. Keep in mind collar width added to the front panel for the length of the zipper. Mark CF with dots and a 2″ slash at CF.
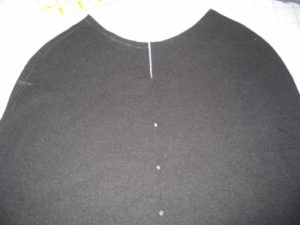
step1

Sew sleeves, back and collar on. Do not sew side seams; you want to work flat.
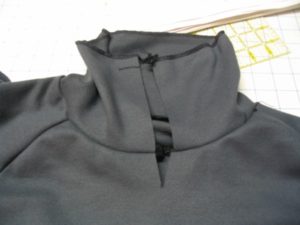
step2

Check length of zipper against collar fold point and your marks.  I have the collar fold marked with a pin. This is the final width of the collar.
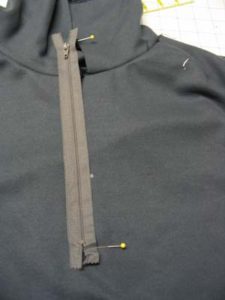
step3

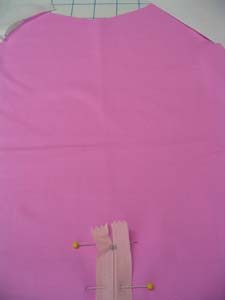
Now, noting the exact placement of bottom zipper stop, mark bottom of the zipper with a pin

step4

Turn zipper RS down and going the opposite way it should, on the RS front. Secure the zipper.
step3-5
step5

Where you have bottom of zipper marked with a pin, use a couple of pieces of clear tape on the WS. This will act as a stabilizer when you sew the bottom of the zipper. 


Part 2, sewing

step6

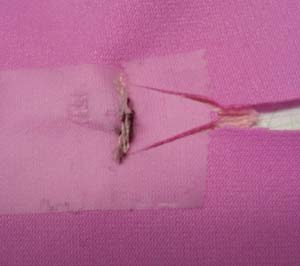
Now, stitching very carefully, stitch across the bottom of the zipper, RS of shirt up, zipper is RS down and pointing the wrong way. Take just a very few stitches, and backstitch. Even as pictured I took a few too many. You just want to secure the end of the zipper, no wider.

Then, you will carefully cut down the CF of your shirt from the slash at top CF, making a “>” at the end of the zipper. Clip EXACTLY to the edge of your stitching and make sure the legs of the  “>” are longer, not shorter.
step7

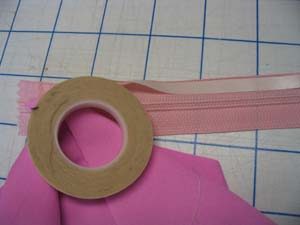
For the next step of actually sewing the zipper tape to the fabric, a nifty notion called Wonder Tape is very helpful. It is washable, and really keeps knits from distorting during this step.

Apply the Wonder Tape to the RS of the zipper.

step9
step8

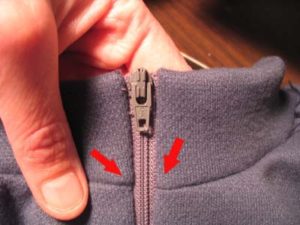
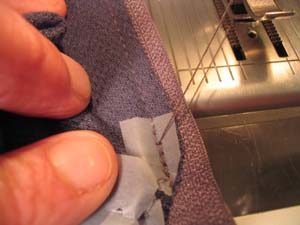
Turn  the long cut edge and press to secure, making sure there is no distortion. Stitch carefully, starting exactly at the apex of the “V” cut. Use the zipper foot to get close to the coil. Note that on the grey fabric, the edge of the fabric opening is placed only part way to the edge of the zipper tape. This is done deliberately, to keep the opening narrow and undistorted.
step11

Finish both sides of the zipper. If you have been careful, you’ll have a nice, even, small  opening like pictured below.  When you are crossing the collar seams, make sure that they match up on either side Check this before you stitch. Fold the seam allowances towards the collar. This will also help with the collar treatment. Pick off any excess wonder tape you can see. The rest will wash out.

step12
step13-5

Collar Finish

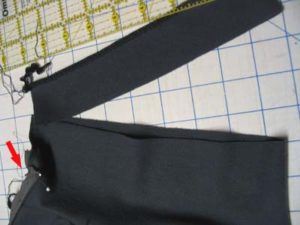
If you’ve done the prior steps correctly, you’ll have a collar attached to your top The zipper should be about 1/2 way up the collar, with the top of the zipper at the desired height of the collar.  One some patterns you may want to trim the collar down. Reserge the cut edge.
step16

Once the collar is trimmed,  finish the top of the zipper by folding it over twice. You can secure the folds with a pin, then fold the collar facing over the zipper tape, RS facing to RS collar. Make sure the top stop of the zipper is at the fold line for the collar, and that the serged edge of the facing is lined up with the collar/neckline seam. Then stitch carefully using zipper foot,  to secure the collar facing.
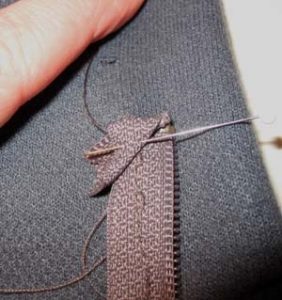
step14
step15

Do both sides. Check that collar seams and top corners/top stops are even by zipping the zipper closed and checking from the right side. Adjust as needed.
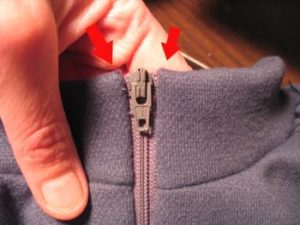
step13

Now for the fun part. We are going to do a “Burrito Style” enclosed finish of the facing. Fold the facing to inside. Use a pin to secure it  about 3/8 from the edge of the zipper, and a chalk or other pencil to make visible marks for that point on both the collar and the facing. (pictured) You might also want to make a marks on the collar facing where it meets the shoulder seam .(not pictured)
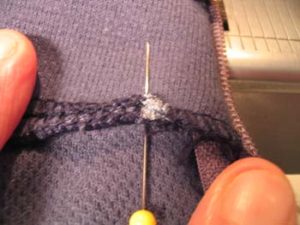
step19

Make sure that both the facing and the collar marked:
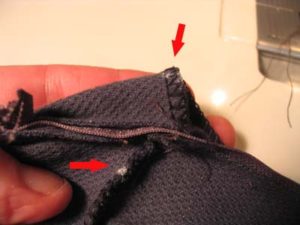
step20-1

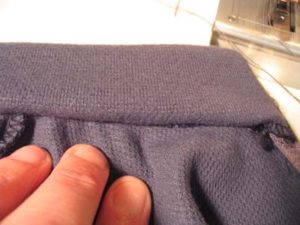
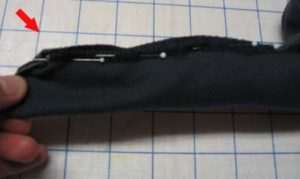
Matching the marks, fold the zipper tape down, and bring the collar facing to the collar seam, seams together, RS of collar facing to WS of shirt front body. Match your marks, and secure the two seams together. The zipper tape and the shirt front will be enclosed in the “burrito”. You should have something that looks like:

Note that the zipper is folded down under my fingers on the left side of the image.
step21

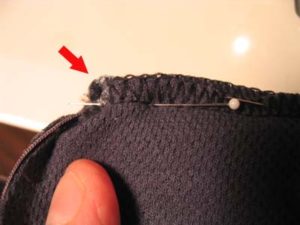
Continue to pin, securing seams all the way from the zipper  to the where the shoulder seam intersects the collar, if not farther. Keep checking to make sure the shirt front and the zipper are not getting caught.

Close up view of the start:
step22

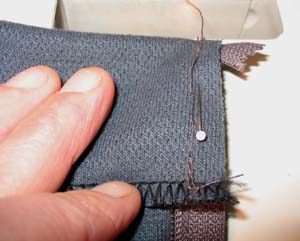
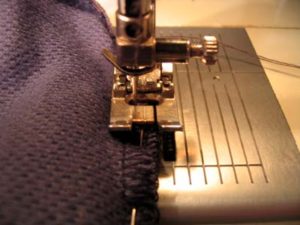
Use a narrow to medium zig-zag, sew your burrito. Start at the chalk marks by the zipper, and the two seam allowances together. Catch only the seam allowances, not the body of the shirt. Go at least to the shoulder seams if not farther.
step23

Go as far as you can before you get to so much bulk folded inside that you have to stop. On most fabrics, you can go at least to where the shoulder seam meets the collar, and on light fabrics, farther. So go as far as you can, then back tack. Carefully undo the burrito checking to make sure you haven’t made any pleats. If you have done it correctly, you will have a nice finished facing. After you have burritoed both sides, to finish the CB part of the facing, just lap the collar facing edge on top of the collar seam edge and stitch in the ditch to hold the facing down.

step24

Common Zipper Problems

With most zipper repairs, it comes down to being able to diagnose the repair and having the correct part, if it can be fixed. Today we are going to look at some common zipper problems.

IMG_4980

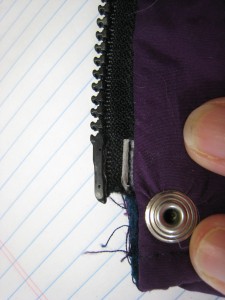
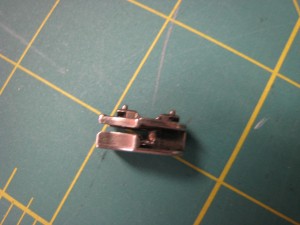
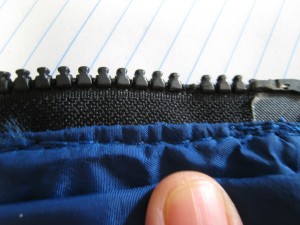
Here, the plastic around the male pin at the bottom of the zipper has completely worn away. The zipper pin will thread into the slider for a while, but it will become more and more difficult as time goes on. This cannot be fixed. The zipper must be replaced.


IMG_4988

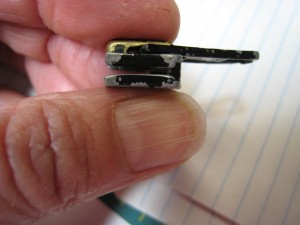
This zipper slider is bent. Even a very slight amount of bending will affect the meshing of the zipper when you zip it. If the zipper itself is not damaged, a new slider of the correct type can replace the bent one. {sidenote – squeezing the zipper with pliers to “fix” it is a stopgap measure only}


IMG_4995


The grab tab on the zipper pull has broken off. This also can be fixed by replacing the slider with an intact slider of the correct type.


IMG_4983


Here, the male pin has popped off the tape of a waterproof zipper. This cannot be repaired and requires a zipper replacement.


IMG_4985


This zipper slider shows classic signs of wear. Notice the very slight bending and the worn outer “corners”. It is very likely that the zipper was not zipping; not staying together when zipped.  This is an easy fix with a new zipper slider of the correct type.


IMG_5005 IMG_5004


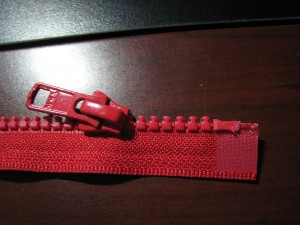
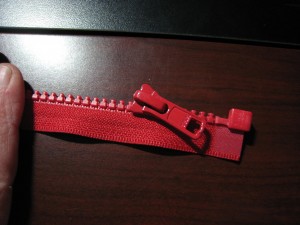
Here, the box has broken off the bottom of a separating jacket zipper.


It is supposed to look like this.

This is not repairable. The whole zipper must be replaced.


IMG_4981


Missing tooth on a vislon (tooth) zipper.

This is not repairable and requires a whole new zipper.


IMG_5003


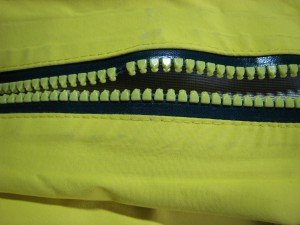
Missing tooth on a waterproof vislon zipper.

This is not repairable and requires a whole new zipper.


That’s all for today. I will keep taking photos of zipper problems and post Part 2 later.

My Machines, Part 3

{yes, I still have a few more}

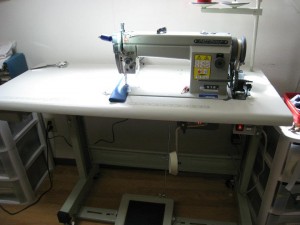
This is the workhorse. I couldn’t do what I do with out it. Silly me, I was advised to get this machine a long time ago, but being a cheapskate I procrastinated for years. I fought with an inappropriate machine for way too long.

Artisan Needle Feed with quiet servo motor

Artisan Needle Feed with quiet servo motor

This is a no-frills needle feed machine.  What is a needle feed?  The needle “walks” (feeds) as it pierces the fabric, moving the fabric back in conjunction with  the feed dogs. This makes for incredibly even feed of varying weights and thicknesses of fabric at any speed. Unlike a walking foot machine, the  presser foot does not walk; only the  needle does.  It does not have an automatic backtack or thread cutter, but that’s fine with me. It has a nice, quiet servo motor.  The needle feed has an incredible range. I can sew ripstop to Cordura with webbing. The key is to have the correct needle and thread.

If you want an industrial machine, and do not have someone local you feel good about, please contact Ron Anderson of A1 Sewing Machines

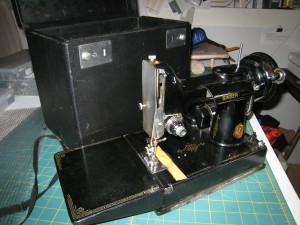
Last, for now, but certainly not least is my Singer Featherweight. IMG_4948


This machine used to belong to my mother-in-law, who was a very talented quilter. She also taught me to quilt; not like I do much of that lately but that is beside the point. This machine is hugely sentimental for me as it is the only thing of hers I got when she passed. And truthfully, this one belongs to my husband’s sister, but she has given it into my caretaking. There was another one that was to be mine, but…(insert family drama).  A funny story about this machine: I brought it up from the SF Bay Area to Washington shortly after 9/11. TSA officials didn’t like this item at all and I was pulled aside for the full meal deal bomb residue wipedown – for a little old lady’s quilting machine.

Coming up – more about different industrial machines, and “what machine should I buy”.

My Machines, Part 2

Sergers

I have the luxury of two sergers. Sergers are a wonderful tool for working with knits and finishing fabrics.

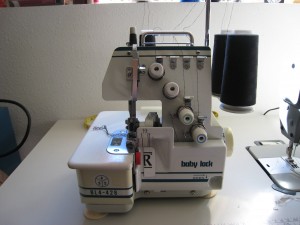
IMG_4630This Babylock may qualify as an antique. It certainly is of the first generation of sergers that came out for home use. I purchased it in 1987 and it still going strong. I’ve probably used it on hundreds of fleece items at this point. It is a 2/3/4 serger in that it will do 2-thread rolled hem, and both a 3- and 4-thread stretch seam/edge finish.


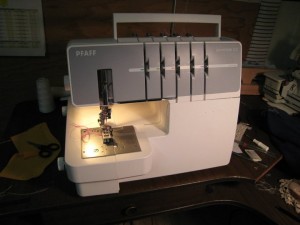
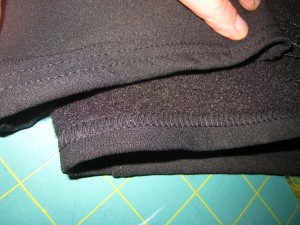
36268_492350889711_4849173_nThis is my Pfaff Coverlock that does several varieties of cover stitch hemming, and this is what a coverstitch hem looks like:

coverstitch on wool knit

What is a cover stitch? It hems and finishes all at once. This machine has been invaluable for professional looking finishes on stretch items, softshells, fleece and more. This serger  also does everything the Babylock does, but I keep it set up just for coverstitching. I don’t use this machine tons, but I am glad I have it for the results it can produce.

triple coverstitch on fleecey baselayer

209930_10150147387229712_4185666_o

coverstitch on powerstretch

Part 3 coming soon!

My Machines, Part 1

I get asked a lot about what machine to use or buy, and what machines I have. I confess I have amassed somewhat of a collection over the years. Some I use more, some I use less. I have pretty much run out of room to add anything new to the stable.  There are  some specialty machines that I would love to have, but needed something three times a years doesn’t necessarily justify the expense or the space.

Some things to consider are that many machines have a limited range of what they can do either in terms of specialty work or the materials that can be handled. With one  partial exception, there is no machine that can do it all. So here is what I have currently:

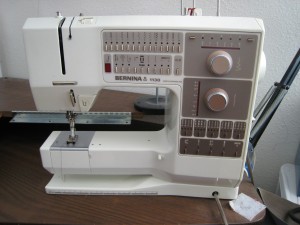
IMG_4629Bernina 1130. I purchased this machine in 1987  to replace a Viking 6000 that I burned the motor up on. For many years, this machine has done almost everything I have asked of it. It is limited by speed, and for heavy fabrics both by  piercing power and the inability to run heavy thread.  However, it is incredibly precise with beautiful stitches. I love the “needle-down” function, the ability to one stitch at a time, and the buttonhole. I don’t use it nearly as much as I used to, but for precision work, button holes and certain repairs it is still very handy. It has even survived lightning strikes to the tune of $300 in circuit board replacement.

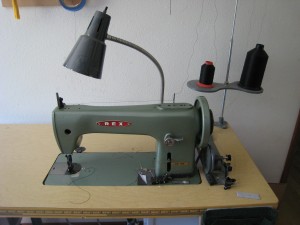
IMG_4628This Rex walking foot has been a shop mainstay for many years. I purchased  it out of the nickel ads 15 years ago. It was a true “driven on Sunday by a little old lady” find.  While the foot is not as high lift as some other walking feet machines out there, it will handle just about anything tough I can stuff under the foot. It lacks real speed, and is not suitable for lighter fabrics. This video illustrates exactly what a walking foot aka compound feed machine does. Additionally, it is designed to run heavy thread and use big needles. Nowadays I use it primarily for repairs involving packs and heavy materials.

More about the rest of my machines soon!

Make Lycra Bike Shorts, Part 1

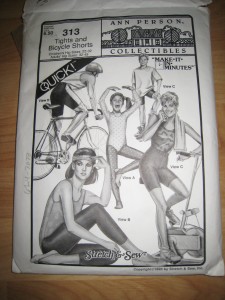
IMG_4632Making biking shorts can be a rewarding project. If you have a serger, a machine that does a zigzag stitch, and basic sewing skills, you should find these easy enough. If you do not have a serger, do not despair as long as your machine has some zigzag options. If you need a reference, the Singer books on active wear, sergers or stretch fabrics are all very good.  Unfortunately, many patterns for cycling gear have been discontinued. You may find them on eBay, Esty or other venues for older patterns. Jalie has made 2216, their multisize pattern for shorts and jerseys, available for download for a small fee. Other patterns to look for are Stretch & Sew 313 and 312, Kwik Sew 1727 and 1233, and Green Pepper 404 and 409. Sometimes retailers will have old stock for sale.

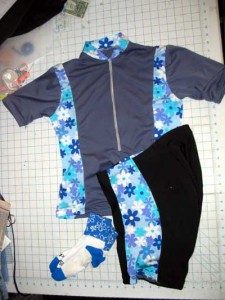
flowerjerseyLycra Notes: Different lycras have different amounts of stretch. Swim lycra is thinner, and is less supportive, plus the quality will  vary depending on where you buy it. Swim prints are fun for a panel insert. Supplex lycra has a lot of give, and is  cool to wear in the summer. 9 oz,  called Beefy or Cordura lycra, is excellent, but heavier/warmer. It is very supportive, and very durable. You may need to go up a size in your patterns if you use this lycra as it is more dense and less stretchy than other types of lycra. There are some two way only lycras out there (rashel knits) These only stretch lengthwise; DO NOT BUY this kind of knit. Be sure the lycra is 4-way stretch.  If your local store does not have a good selection of lycra, check the Sources page.

Sewing notes: For seams, a serger with wooly nylon is best. You can experiment with flat-lock seams if you want, but I have not had good success with the typical 2/3 thread flat lock options. If you have a cover stitch machine, you can play with seaming it from both the RS and WS to mimic a top loop cover stitch. If you only have a regular machine for your seams, look and see if your machine does this stitch: __//__// ; it is an excellent stitch for seaming lycra.

Chamois/Pads: I used to make them from scratch but forget that. AeroTech Designs has a fabulous selection of chamois to choose from to put into your shorts. The pads come with installation instructions.

Cut: Cut the pattern according to directions. You may want to add extra length to the legs, or some additional seam allowance if you think you might want to make adjustments to the fit. Mark the pieces carefully as it is easy to get the panels mixed up. Because of narrow seam allowances, use a pencil to mark instead of snips. If you want to put in a print accent, replace one of the side panels. Do not put on the elastic at the waist or legs, or put in the chamois yet.

Fit: Once you have the shell of the short made, you can tweak the fit. I have a really small waist, so I always take it in from the hips on up. You can also make the legs longer or shorter, or lower the waist. Do not forget that you will fold over the waist and the legs 1″ when you add the elastic.

Installation of waist and gripper elastics is  covered in Lycra bike shorts Part 2

Note: This is an updated version of an article that used to exist on the original website

“How Did You Get Into This?”

I get asked a lot, “how did you get into this”? I’ve been sewing my whole life, starting with little blankets for my Breyer horses. I was first exposed to the outdoors industry working for Pat Smith and MountainSmith in 1983 when he was still in his garage and made the move to the  first facility. There,  I was a jill-of-all-trades batching packs for the sewers, inspecting packs, shipping and almost anything else. This was my first exposure to entrepreneurship, outdoors goods, industrial machines and production.

I cobbled together most of an apparel design degree but  did not complete it due to life happening.  I spent a lot of years doing custom clothing and bridal. When we moved to Spokane it was a great opportunity to quit that niche. Honestly, as a jeans-coated-with-dog-hair kind of gal, and piles of gear all over the place, it never was a good fit.  In the meantime, I was rummaging through the back tables in fabric stores as the first fleeces were just starting to come out.   A few patterns became available and I was able to outfit my husband and little boys with fleece garments. Adult fleece garments were spendy, and there was nothing for kids. In my quest to make affordable gear, I began to reverse engineer, tweak, and search out information that was not obvious for the home sewer.  This was noticed in the community, and a guy said to me, “you should be repairing gear”. What a great idea!

Spokane is the kind of place where small businesses are supported by the community, and we have a very active outdoors community here. It wasn’t long at all before I was getting known as “The Zipper Lady”.  I got the bright idea to build a website in ’97 or so, and established an online presence. Back then it was easy: hand code some HTML, add some links and voila`: a website is born.

I had read about Usenet in a women’s magazine and I sought out rec.backcountry. My Usenet newbie “hello, I can fix your gear” post did not go over well, and the trolls had a field day. I do not remember who it was, but I am ever grateful to the kind soul who emailed me and gently explained the Usenet faux pas I had made and let me know the correct way to (non) advertise on a non-commercial newsgroup. The key was participation and a one line signature, so that’s what I did. I helped people do their own repairs, told them where to find materials, advised them on gear care, and in return, they called on me when it was time for a pro. In addition, I was for many years a moderator and participant in the Gear Makers forum at the Backpacking.net site.

Throughout all this, the work started coming in. Whether it was a referral from a website, friend-of-a-friend, search engine, an outdoors club, or a referral from a manufacturer I confess I never kept track after I got to 45/50 states and some international work.  I now have arrangements with  local stores to collect local work, in addition to contract work and all the great folks that somehow find me. I’ve never consciously advertised, but I do believe that the willingness to share information and help other when I can contributes to things coming my way.  This leads me to thoughts on hoarding information, which will be posted another day.

Working With Silnylon

This is the first of several articles from the “old” site that I will be reissuing on the blog. I have some great info on tarps along with a file full of assorted schematics that I plan to put together in a tarps entry coming up.

Silnylon is silicon impregnated ripstop nylon. It is extremely waterproof, extremely lightweight (1.1 oz. per yard), and extremely durable. Ultralight backpackers love it for this reason. It’s a little tricky to work with, but making your own gear out of silnylon is very rewarding.  Tarps, tarptents, raingear and even re-usable shopping bags can be made with silnylon.

You can find it at Thru-hiker.com, Outdoors Wilderness Fabrics. Check the Sources page for additional suppliers.

Sewing:

  • use “taut sewing”: apply tension to the fabric with your hands, in front of and in back of the needle. The object is to tension the fabric, not pull it through.
  • use a good quality polyester thread
  • a walking foot (even feed) is a very helpful accessory
  • Use a #80 or 90 needle and make sure it is new and sharp


Pinning:

  • glue stick
  • binder clips
  • pins in seam allowance

 
Cutting:

  • use SHARP shears.
  • try hot cutting two layers with a soldering iron, using a sheet of glass underneath. This will seal your cut edge so it won’t ravel, and if your two edges are going to be seamed anyway it will hold them together.
  • rotary cutter with mat

 
Seam ideas:

  • Plain Hem: fold 3/4″ twice and edgestitch.
  • Mock flat fell seam: illustrated here. To make a “mock” felled seam, use a 1″and 1/2″ seam allowances, and fold the longer one around, then top stitch
  • Seam illustrated at Ayce’s Workshop

 
Sealing silnylon: use McNett Silnet.