
Hello! Here is the updated version of this tutorial, originally posted in 2002. I’ve added video segments that I hope you will find helpful. Link to full (32 min) video here. I suggest you watch the videos in addition to reading the photos and text. This tutorial is a mix of the old material and new and is not quite as seamless as I would wish. I recommend you read, look at photos, and watch the video.
If you are looking for a smooth, foolproof way to insert a zipper into knits or base layers, look no further. I will show you how to do an enclosed inside finish, even and matching seams, and a very tidy zipper insertion. You can use this technique with almost any zippered collar: base layers, vests, jackets.
Note: if you are making a jacket or vest with a full length zipper, you can skip to Part 3.
Thanks to Jalie Patterns for the the zipper insertion technique.
Part 1, prepare to insert the zipper
(CF=Center Front, WS=Wrong Side, RS=Right Side)
Adjust, layout and cut your pattern as usual. Figure out how long you want the front zipper to be, and mark the CF. Keep in mind collar width added to the front panel for the length of the zipper. Mark CF with dots and a 2″ slash at CF.

Sew sleeves, back and collar on. Do not sew side seams; you want to work flat.
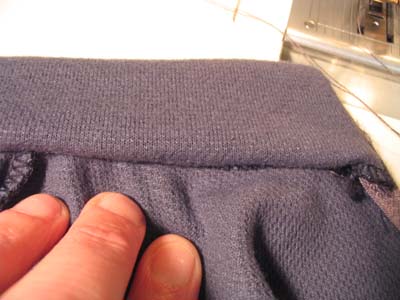
Check length of zipper against collar fold point and your marks. I have the collar fold marked with a pin. This is the final width of the collar.

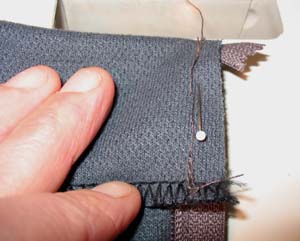
Now, noting the exact placement of bottom zipper stop, mark bottom of the zipper with a pin:

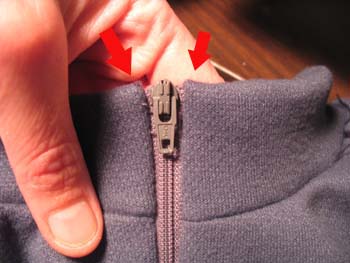
Turn zipper RS down and going the opposite way it should, on the RS front. Secure the zipper.

Where you have bottom of zipper marked with a pin, use a couple of pieces of clear tape on the WS. This will act as a stabilizer when you sew the bottom of the zipper.
Part 2, sew the zipper
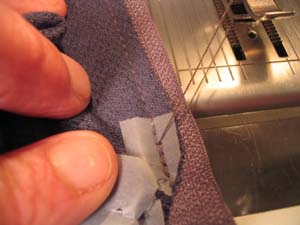
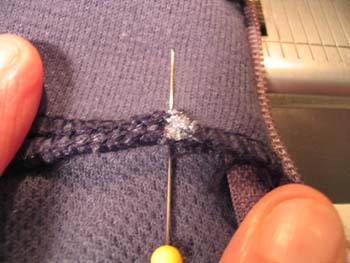
Now, stitching very carefully, stitch across the bottom of the zipper, Next to the zipper stop. The RS of shirt up, zipper is RS down and pointing the wrong way. You will stitch next to the bottom of the stop, just as wide as the coils of your zipper, no wider. Take just a very few stitches, and backstitch. Even as pictured I took a few too many. You just want to secure the end of the zipper.

Then, you will carefully cut down the CF of your shirt from the slash at top CF, making a “>” at the end of the zipper. Clip EXACTLY to the edge of your stitching and make sure the legs of the “>” are longer, not shorter.

For the next step of actually sewing the zipper tape to the fabric, a nifty notion called Wonder Tape is very helpful. It is washable, and really keeps knits from distorting during this step.
Apply the Wonder Tape to the RS of the zipper. Turn the long cut edge of the fabric and press carefully to zipper tape to secure, making sure there is no distortion. Do not stretch or distort. Now stitch carefully, starting exactly at the apex of the “V” cut. Use the zipper foot to get close to the coil. Note that on the grey fabric, the edge of the fabric opening is placed only part way to the edge of the zipper tape. This is done deliberately as placing the cut edge at the edge of the zipper tape will take up to much seam allowance. Stitch from bottom to top stop on both sides.
Note: Normally I teach to sew the zipper with the fabric down, zipper tape up for reasons of easing the fabric. In this case, we want to see *exactly* where we are are putting the needle to start sewing from our cuts, and we do this with the fabric side up.
Part 3, finish the top of the zipper
If you’ve done the prior steps correctly, you’ll have a zipper attached to main part of the collar. The zipper should stitched up to the top stop, which is just at the desired height of the collar. Finish the top of the zipper by folding it over twice. You can secure the folds with a pin, then fold the collar facing over the zipper tape, RS facing to RS collar. Make sure the top stop of the zipper is at the fold line for the collar, and that the raw edge of the facing is 3/8″ below the the collar/neckline seam. Using a regular zipper foot, baste the facing into place. Turn RS out and and check that the top stop is where you want it. Then go back and stitch with a zipper foot, from top of zipper to the collar seam, no farther. Do both sides. Check that collar seams and top corners/top stops are even by zipping the zipper closed and checking from the right side. Adjust as needed.


Part 4, the actual burrito
You will really want to watch the video for this part. This is where we make the actual a “Burrito Style” enclosed finish of the facing. Fold the facing to inside. Use a pin to secure it, matching the neck seam line to the seamline of the facing. Make the following marks on the facing and the neck seam: center back, shoulder seams, a point 1/2 way between shoulder seams and center back, and on facing only, exactly where the edge of the zipper tape is.
Matching the marks, fold the zipper down, and bring the RS collar facing to the collar seam, seams together, RS of collar facing to WS of shirt front body. You may have to “roll” the zipper to enable bringing the facing around. If you have done this right, the zipper is inside. Line up the neck seam with the seamline of the facing matching the mark a the zipper tape and the shoulder seams, secure with pins. The zipper tape and the shirt front will be enclosed in the “burrito”. You should have something that looks like:

Your burrito should look something like:
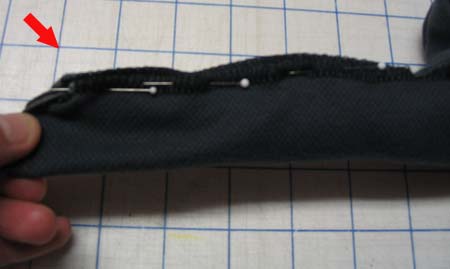
Tips: This is very fiddly so be patient with yourself. Feel for any folds or places where the fabric inside the burrito might be caught with a pin. You can work the start point with your fingers (arrow above) to make sure the seam allowances are flat.
Now, sew your seam. Start at the marks by the zipper tape, then follow over the existing neck seam with the facing, all three layers. Sew at t least to the shoulder seam. Make sure you sew only along the seam allowances, not catching the body of the shirt. Carefully pull on your burrito to turn it right side out. Check for small pleats or catches and fix them if you need to. Once you have it the way you want, press or finger press; you can even topstitch if you want. You are all done!