Category Archives: Fabric Tech

A Few Laundry Tips

The Special Stinky Bike Gear Recipe:
Soak in “Biz” overnight, at least 12 hours. this is an enzyme
based presoak that goes after organic matter, not your regular presoak.
Then, rinse that out and then run through the wash with a laundry product
called Oxyclean, which is not an detergent it’s an additive. You should be
able to get that at any supermarket.
This is courtesy Judith from www.fabrics.net ~ thanks!!

Getting Hardshells CLEAN:
Have you ever noticed that doing the two step washing process (as per label instructions) for hardshell garments doens’t really get the items “clean”?
Try this method, courtesy Mr. Mender in Sechelt, BC, Canada.
Wash your hardshell item in regular launder detergent. Treat grimy areas with your favorite treatment such as Shout. Then, rinse your item 3 times in clear water. Now, do the two step process, wash and DWR renew. It was explained to me that the wash-in cleaner is a vehicle to prepare the garment for the DWR renewal, and not a cleaner pe se. I have had good success with this method.

Hand Wash:
Did you know that baby shampoo is an excellent substitute for special products such as Woolite? It’s much cheaper, too. If you have a front load washer, you can do hand wash in the wash -yay!!

Sports Detergent:
Save your money and use regular laundry soap with an oxygenator add in.

Bike Grease:
Use Dawn and/or Simple Green.

Dryers:
Heat is the enemy. Line dry things as much as possible. The exception is when doing a DWR treatment. This requires a LOW temperature dryer to be effective.

Down Items:
Down items can be washed at home. Do not use a washer with an agitator. The keys to washing down is a mild soap like Down Wash by Nikwax, and prolonged very low temperature drying in a dryer. You will have to tennis balls to help break up clumps, and break up clumps manually too. It takes HOURS but can be done sucessfully. You can’t rush this process.

Tent Tips: Care and Selection

I repair dozens of tent zippers every season. Many people seem surprised when their tent zipper fails. Zipper slider failure is extremely common, and it is caused mostly through normal wear and damage.

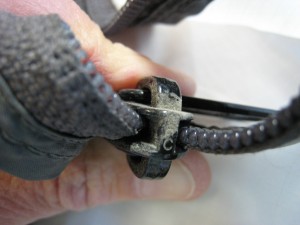
The most common symptom  of slider failure is that the zipper coil will not zip closed,  or separates at a certain point on the zipper. This is typically an indicator of a worn slider. Worn sliders can easily be replaced, provided they are not an off brand. Damaged (bent) sliders will also exhibit this behavior. Coatings on zipper sliders are not particularly durable and wear down easily.

If your tent zipper is not zipping, the slider most likely worn from dirt and grit, or it has been bent from hard use, getting stepped on, being squeezed with pliers, or similar. The whole zipper does not need to be replaced, just the sliders.


A good example of how dirty tent coil gets.

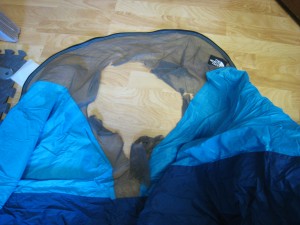
A good example of how dirty tent coil gets. This tent had been hosed down but they did not hose the zippers out.

Here are important tips on tent care:

KEEP YOUR ZIPPERS DIRT, SILT, AND GRIT FREE!!!! Depending on where you camp, shaking/sweeping the tent out may be sufficient. More likely, you will want to clean your tent. Set it up in the yard, and take a hose to it. Do not use any cleaners or brushes. A rag made from an old towel will pull micro dirt off the floor really well. Wipe down the seams and spray the zipper coils with the sprayer. Dry thoroughly.

dog ran through tent door

Door Damage, dog ran through tent door

TRAIN YOUR TENT PARTNERS. Do not leave the door lying in the dirt. Watch the kids and the dogs. Open doors fully, do not leave zippers part way open. Roll up the tent door and keep it out of the dirt.


DO NOT FORCE ZIPPERS! If there is a fold of fabric caught in the zipper, work to gently free it. You can pull hard enough on the slider to damage the slider, the coil, or tear the fabric.

CLEAN YOUR TENT: Hose tent off and let air dry, thoroughly. If tent is gritty, use a sponge or rag to wipe dirt off. Never use a scrub brush, harsh detergent, or put tent in the washer. Pay special attention to hosing off the zippers. Note: I have been hearing good reports from people who have washed tents without detergent in a front loader  (non-agitator) machine. I have not tried this myself but you are welcome to experiment. Agitators can tear doors and ties downs, and detergent will strip the waterproofing. YMMV.

NEVER PUT A TENT AWAY DAMP: This is the number one cause of mildew, which eats away at the waterproof coating on your tent. There is no fixing mildew.

Commonly asked questions about tent care, and a few comments.

Lubing zippers? If you want to use a dry lube, McNett sells a zipper lube. Do not use Vaseline or any grease product on the zipper. It’s better just to keep your tent zipper clean and grit free.

Re-waterproofing the fly? Both Nikwax and Grangers’ make excellent products to renew waterproofing and/or DWR (Durable Water Repellency). Grangers’ also makes a combination waterproof/UV protector for fabrics. Order from www.mgear.com  I have not had good success with “K-kote” but others have tried it. It might be easier to just pitch a blue tarp over the tent if the fly is leaking that bad.

Smelly tent? It’s one of two things (unless it got skunked or peed on by a dog): mildew, or hydrolyzation of the polyurethane coating. Neither is fixable. Mildew is from moisture, and hydrolyzing of the PU is due to age and exposure to environmental conditions.

Zipper separates when the tent is staked out taut? Don’t stake it so tight. If it is impossible to not stake it taut without a zipper pulling apart, that is a design flaw. A new zipper or a beefier is not going to fix this.

Floor leaks? You can try to recoat the floor with K-kote. It is a really messy project and results are iffy at best. My suggestion is to cut a piece of blue tarp the same size as the tent floor and place that down inside the tent.

Make a new fly? Absolutely not. If your friend lost the fly when they borrowed the tent, make them buy you a new tent. If  “the rest of the tent is in good shape, it’s just the fly that’s old”, the rest of the tent is NOT in good shape; it’s just as old as the fly. The body of the tent may  not show the age that the  UV-baked fly is showing, but trust me, it’s old.

I’m going to close with my soapbox: “You really do get what you pay for”. Yes, I know you’ve camped successfully for years in your $99 box-store special. I’m happy for you and glad it’s working out. However, here is why I don’t love them:

  1. Low thread count fabric. It’s not very dense which is less weather repellent
  2. Fewer stitches per inch out of really crappy thread – seams are not as strong
  3. Off brand zippers have really soft metal zipper sliders that wear out faster
  4. Blue tarp floors
  5. Minimal fly

I’ll discuss how to identify sliders for replacement later on. Until next time…

Keeping Technical Clothing Clean

I’ve heard it many, many times:

“You are supposed to wash it?”

“I don’t want to ruin it by washing it.”

“My coat doesn’t keep me dry anymore but I have never washed it”.

Really? You think that sweat, grime, and dirt is GOOD for your clothing? Enough of my ranting. Keeping your investment clean a critical component to making it last. Salt, grime, sweat,  and body oils reduce the function of the properties that make your clothing special. Surface dirt affects the DWR (Durable Water Repellency), and the rest of it can clog moisture movement.

The days of Ivory Soap Flakes are long gone. Now there are excellent products out on the market that make keeping your clothing clean and functioning easy. The two main product lines are Nikwax and Granger’s. They both make a full line of environmentally friendly and easy to use laundry products specifically formulated for different types of fibers. You will want to read the label to be sure you are matching the right product for your particular item. There are down washes, soft shell washes, fleece washes and washes for hardshells and even ropes.

For hard shells, you will have the choice of a one-step or two step process. The steps are cleaning your item, and refreshing the DWR. The two-step process is washing first, then waterproofing.   I have not yet tried the newer one step products. If you opt for the two step process for your hardshell, I suggest using the spray-on for the #2 step, and not the wash-in. The reason to choose the spray on is that that you will not be coating the lining of your item with DWR, which, if coated, can make it feel funky and possibly reduce the effectiveness. Whether you go one-step or two, it is easy: just follow the directions on the bottle.

I wash all our shell clothing at the end of the ski season, and then again mid-way through. One additional thing you can do with your shells is to toss them in a low dryer for a few minutes without washing them. The heat reactivates the DWR, which is the treatment that makes moisture bead up on the outside.  WARNING: use a low dryer, not hot. Hot dryers are the enemy.  The DWR does lose effectiveness after time, due to environmental conditions, so you will want to renew it using the above instructions to wash and renew. You know if moisture is not beading up that it’s time.

You can do down items with down-specific products. There are two critical elements. The first is to only use a non-agitator washer like a front loader, and the second is drying your down. The drying is the critical element with down as it can take hours of air dry and breaking up clumps by hand to get your item fully dry.

A few other tips:

  • HOT dryers are the enemy. Avoid them at all costs. You can melt things and  cause seam seal tape to delaminate.
  • You can use “Shout” and similar laundry helpers to get grime and grease out. You can even use Simple Green or Dawn for things like chair lift grease.
  • Do not spend extra money for sportswear oriented laundry products. Just use your regular stuff with some OxiClean.
  • For handwashing, just use baby shampoo instead of Woolite. Milder, and cheaper.


Demystifying Waterproof Breathable Fabrics

On the old site, I had a page about waterproof breathable fabrics. It was an attempt to decode the technical jargon and explain the differences in the various types of waterproof breathable fabrics. Two-layer? Three-layer? Monolithic coatings? It’s very overwhelming for we fabric tech people, much less the lay person.  Instead of trying to explain all this myself in a new, updated article, I am sharing this excellent article that is current and does a fantastic job of cutting through the BS and obfuscation that surrounds fabric technology. Even if you are like me and all the tech-speak starts to sound like Charlie Brown’s teacher (“wrrrrrr-wrrrrrr-wrrrr”), this one is highly readable.

The following article comes from Blister Gear Review,  an independent adventure sport website whose mission is to publish the most in-depth and honest gear reviews on the planet.   I really like this blog for its non-nonsense, real world reviews. My original intent was to reprint the article here, but at 5+ pages with images it’s easier to link. This article is a “must read” if you have any interest at all in understanding the technology that drives outerwear design and technical fabric development and use.

Outerwear 101

Excerpt:
2L vs. 3L Shells

Here is an important question when purchasing a shell: 2 Layer or 3 Layer? And does it really matter?

2L – The Original

2L garments are constructed with two layers; a nylon face fabric (generally with a DWR) that is bonded to a WP/BR laminate. 2L garments are always lined with some sort of lining fabric. These linings are generally made of thin nylon or mesh, and serve two purposes. First, the lining keeps the laminate from direct contact with the skin. This is important because the laminate generally has a plastic feel to it and can be quite uncomfortable.

The lining’s main purpose, however, is to protect the laminate. Even though the laminates are engineered to be resistant to fouling, without further protection of the laminate, its durability can suffer greatly. 2L garments are generally constructed with some amount of seam taping. Seam taping keeps water and wind out at the seams, but does not breathe.

2L outerwear dominates the market for many reasons. 2L construction lends itself quite well to making insulating garments, which dominate the consumer market. (People want their coats to be warm. Who knew?) 2L construction is also less expensive because the technology has been around much longer. The construction of the garments is easier because the lining allows many sewing options with less need for seam taping, and the design is easier because of the ability to work with a lining.

3L – Or, Why does this jacket cost $600???

3L garments are constructed with 3 layers: (1) a nylon face fabric (with a DWR) that is bonded to (2) a WP/BR laminate, which is bonded to (3) a tricot layer on the inside.

3L construction: blue = nylon face, yellow = WP/BR laminate, orange = tricot liner

3L construction: Blue = nylon face; Yellow = WP/BR laminate; Orange = tricot liner.

3L garments are not constructed with a lining and are therefore often shells. 3L pieces generally use the most advanced (and therefore expensive) fabrics and laminates. These fabrics make up some of the most technical pieces of outerwear available. Construction of 3L garments is difficult. Every seam has to be taped or welded, and every cut greatly modifies the look of the garment. Given that both seam taping and the fabric are extremely expensive, and construction is difficult, 3L garments can be costly pieces of outerwear.

So why bother to make (or buy) a 3L jacket, when you could just produce or purchase a 2L jacket?

There are a few reasons why 3L construction has gained a lot of momentum in the industry lately. First is performance: the addition of the bonded tricot liner increases the breathability of the garment. The tricot is hydrophilic and, as you sweat, the tricot preferentially absorbs your sweat and transports it to the laminate so it can diffuse out. Contrast this with a 2L garment, where the water vapor has to randomly bump into the laminate while navigating between your skin and the lining to diffuse out.

The next advantage is weight. 3L garments can be made without a lining, and therefore, save a substantial amount of weight when compared to their 2L counterparts.

The final advantage is the durability of 3L construction. The addition of the tricot liner adds a significant amount of support and protection for the laminate that is not present in a 2L garment. In short, a 3L garment will have better performance, with less weight, and be more durable than a comparable 2L design—albeit at about twice the cost.

2.5L – Or, What in the hell is a half a layer?

This is not a very common construction in the world of winter outerwear, but it is a common source of confusion, so we’ll briefly touch on it.

A 2.5L fabric is made up of two and half layers—sort of. It has a nylon face fabric (with a DWR), a WP/BR laminate, and then a printed lining. This printed lining is present for the sake of protecting the laminate, but does little to eliminate the clammy, plastic feeling of the laminate directly on the skin; hence the designation of a half of a layer. 2.5L fabrics are used on active rainwear because they are easier to produce and end up being lighter than 3L garments, though less comfortable.


Mildew – what to do?

(note: this is from an old draft I evidently forgot about. Looks useful!!)

Removing Mildew
Remove mildew spots from clothing as soon as you discover them. Brush off mold outdoors so mildew spores do not scatter in the house. Sun and air fabrics thoroughly. If mildew spots remain, pretreat them by rubbing detergent into the dampened stain. Launder the items in hot water and chlorine bleach, if safe for fabric, and detergent. Rinse well and dry in the sun. If any stain remains, use lemon juice and salt. Again spread in the sun to bleach. Rinse thoroughly. Chlorine bleach is effective in killing the mildew growth and eliminating the staining. However, it cannot be used on silk, wool or nylon.

Sodium perborate and hydrogen peroxide are mild oxidizing bleaches. Use sodium perborate if the garment contains silk, wool or nylon. However, it is not safe for white silk and wool. Hydrogen peroxide is safe on all fibers and most colors, but be sure to test for colorfastness. Because these bleaches are mild, they are not very effective in removing mildew stains and will not actually kill the fungus.


Take non-washables to the drycleaner; identify the stain.

Remove mildew from leather foods by wiping the surface with diluted alcohol (l cup denatured or rubbing alcohol to l cup water). Dry in a current of air; use a fan for better circulation. If mildew remains, wash with saddle soap, or a soap containing a germicide or fungicide. Wipe with a damp cloth and dry in an airy place. Polish leather shoes and luggage with a good wax dressing.