On the old site, I had a page about waterproof breathable fabrics. It was an attempt to decode the technical jargon and explain the differences in the various types of waterproof breathable fabrics. Two-layer? Three-layer? Monolithic coatings? It’s very overwhelming for we fabric tech people, much less the lay person. Instead of trying to explain all this myself in a new, updated article, I am sharing this excellent article that is current and does a fantastic job of cutting through the BS and obfuscation that surrounds fabric technology. Even if you are like me and all the tech-speak starts to sound like Charlie Brown’s teacher (“wrrrrrr-wrrrrrr-wrrrr”), this one is highly readable.
The following article comes from Blister Gear Review, an independent adventure sport website whose mission is to publish the most in-depth and honest gear reviews on the planet. I really like this blog for its non-nonsense, real world reviews. My original intent was to reprint the article here, but at 5+ pages with images it’s easier to link. This article is a “must read” if you have any interest at all in understanding the technology that drives outerwear design and technical fabric development and use.
Outerwear 101
Excerpt:
2L vs. 3L Shells
Here is an important question when purchasing a shell: 2 Layer or 3 Layer? And does it really matter?
2L – The Original
2L garments are constructed with two layers; a nylon face fabric (generally with a DWR) that is bonded to a WP/BR laminate. 2L garments are always lined with some sort of lining fabric. These linings are generally made of thin nylon or mesh, and serve two purposes. First, the lining keeps the laminate from direct contact with the skin. This is important because the laminate generally has a plastic feel to it and can be quite uncomfortable.
The lining’s main purpose, however, is to protect the laminate. Even though the laminates are engineered to be resistant to fouling, without further protection of the laminate, its durability can suffer greatly. 2L garments are generally constructed with some amount of seam taping. Seam taping keeps water and wind out at the seams, but does not breathe.
2L outerwear dominates the market for many reasons. 2L construction lends itself quite well to making insulating garments, which dominate the consumer market. (People want their coats to be warm. Who knew?) 2L construction is also less expensive because the technology has been around much longer. The construction of the garments is easier because the lining allows many sewing options with less need for seam taping, and the design is easier because of the ability to work with a lining.
3L – Or, Why does this jacket cost $600???
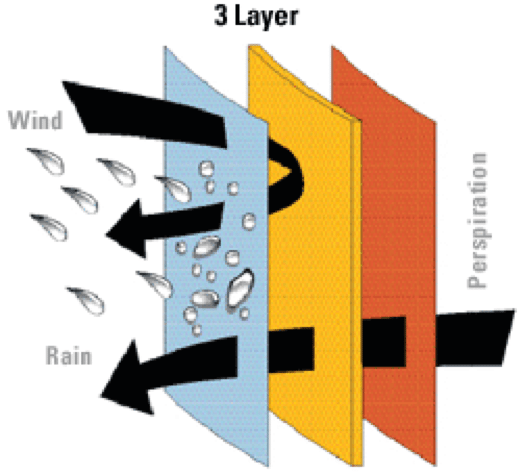
3L garments are constructed with 3 layers: (1) a nylon face fabric (with a DWR) that is bonded to (2) a WP/BR laminate, which is bonded to (3) a tricot layer on the inside.

3L construction: Blue = nylon face; Yellow = WP/BR laminate; Orange = tricot liner.
3L garments are not constructed with a lining and are therefore often shells. 3L pieces generally use the most advanced (and therefore expensive) fabrics and laminates. These fabrics make up some of the most technical pieces of outerwear available. Construction of 3L garments is difficult. Every seam has to be taped or welded, and every cut greatly modifies the look of the garment. Given that both seam taping and the fabric are extremely expensive, and construction is difficult, 3L garments can be costly pieces of outerwear.
So why bother to make (or buy) a 3L jacket, when you could just produce or purchase a 2L jacket?
There are a few reasons why 3L construction has gained a lot of momentum in the industry lately. First is performance: the addition of the bonded tricot liner increases the breathability of the garment. The tricot is hydrophilic and, as you sweat, the tricot preferentially absorbs your sweat and transports it to the laminate so it can diffuse out. Contrast this with a 2L garment, where the water vapor has to randomly bump into the laminate while navigating between your skin and the lining to diffuse out.
The next advantage is weight. 3L garments can be made without a lining, and therefore, save a substantial amount of weight when compared to their 2L counterparts.
The final advantage is the durability of 3L construction. The addition of the tricot liner adds a significant amount of support and protection for the laminate that is not present in a 2L garment. In short, a 3L garment will have better performance, with less weight, and be more durable than a comparable 2L design—albeit at about twice the cost.
2.5L – Or, What in the hell is a half a layer?
This is not a very common construction in the world of winter outerwear, but it is a common source of confusion, so we’ll briefly touch on it.
A 2.5L fabric is made up of two and half layers—sort of. It has a nylon face fabric (with a DWR), a WP/BR laminate, and then a printed lining. This printed lining is present for the sake of protecting the laminate, but does little to eliminate the clammy, plastic feeling of the laminate directly on the skin; hence the designation of a half of a layer. 2.5L fabrics are used on active rainwear because they are easier to produce and end up being lighter than 3L garments, though less comfortable.

